Nếu bạn là sinh viên khối ngành kỹ thuật, đặc biệt là công nghệ thông tin hay khoa học máy tính, thì sẽ không thể không biết đến GitHub. GitHub là một trang web cho phép quản lý và chia sẻ mã nguồn, nâng cao hiệu suất khi lập trình.
Hồi tháng 10 2021, GitHub ra mắt Copilot để hỗ trợ lập trình viên viết và debug code bằng AI. Một tin tích cực cho các bạn sinh viên có email Edu là các bạn có thể sử dụng Copilot miễn phí.
Chỉ cần làm theo hướng dẫn ở trên là xong rồi. Mình học trường Bách Khoa TPHCM nên có đuôi email là hcmut.edu.vn. GitHub tự động nhận diện được trường do trường cũng đã đăng ký xác thực với bên GitHub rồi. Sau đó, bạn chỉ cần chụp ảnh thẻ sinh viên gửi lên và đợi là xong.
Lập trình web hay mobile thì đều tới lúc phải chọn màu sắc sao cho đẹp, vừa mắt và phù hợp với nội dung mình muốn truyền tải. Sau đây là 2 trang web mình thấy khá hay để hỗ trợ dev (vốn không quá ‘giỏi’ về mặt thẩm mỹ, ý kiến chủ quan) trong việc xây dựng trang web hay ứng dụng mobile.
Mình đang làm việc với flutter, và cách công nghệ này chọn màu với ngôn ngữ Dart làm mình hơi lúng túng — tại có nhiều lựa chọn quá. Nếu truyền mã hex như trên mạng (ví dụ #F4F1DE thành 0xF4F1DE) rồi đặt biến thì nó hơi phiền ở chỗ: (1) nó là một biến int, khó quản lý, (2) nó hiển thị màu không đúng như ý mình. Do đó, mình chuyển nó thành RGBA, rồi gán nó vào một biến Color luôn.
Color mainColor = const Color.fromARGB(255, 244, 122, 95);
Happy coding!
Update 21/7/2022: thực ra không cần làm nhiều như thế, chỉ cần lấy mã hex xong append nó vào string sau: “0xFF”. Ví dụ màu ở trên sẽ là #0xFFF4F1DE. Learned this the hard way. 😅
When you’re working with some datasets in R-studio, you have to define an absolute path to such file and set the working directory of your script accordingly. Doing this would be very time-consuming in some occasions. Luckily, there’s an API call that can simplify the process.
It is best that you place the R-script and the datasets in the same folder. Make sure to include the given command at the top of your script for the best portability. If your collaborators want to run the R-script on their computer, they wouldn’t have to change the working directory themselves, how cool is that!
Với một người không rành máy móc thì hẳn họ cũng sẽ biết rằng máy tính hoạt động theo nguyên tắc của hệ nhị phân (0 và 1). Các phép thao tác bit (bit-wise operations) trong C++ là một thứ khá hay ho để ta có thể vận dụng hệ nhị phân để giải quyết một số bài toán lập trình, mà chủ đề hôm nay sẽ là về kiểm tra tính chẵn lẻ của một số bất kỳ.
Thuật toán kiểm tra cơ bản rất dễ hiểu. Ta thử xem liệu số n nào đó có chia hết cho 2 hay không: nếu chia hết thì số đó là số chẵn, ngược lại là số lẻ.
Với các thao tác bit, ta sẽ ghép n với số 1 bằng toán tử AND. Toán tử AND sẽ chỉ trả về 1 nếu cả hai bit đầu vào đều là 1, đúng theo bảng chân trị của lý thuyết toán rời rạc. Khi một số lẻ ở hệ thập phân được chuyển đổi sang hệ nhị phân, chữ số cuối cùng sẽ luôn là số 1. Lợi dụng điều này, ta sẽ biết được số n ban đầu là lẻ hay chẵn bằng cách xem xét output của AND.
Ưu điểm của thao tác bit là nó chạy nhanh hơn cách thông thường, với lại làm bạn ngầu hơn với cả những người đã biết lập trình (haha).
Sau đây là đoạn code C++ mô phỏng lại những gì mình vừa nói.
#include <bits/stdc++.h>
using namespace std;
int main(){
     int n = 7;
     if (n & 1){
           cout << "odd number.";
     } //& là ký hiệu của phép AND trên C++.
     else cout << "even number.";
}
Số nguyên tố là thứ quá đỗi quen thuộc với những ai học toán, cũng như đối với các lập trình viên. Ai học giải thuật đều đã giải qua những bài về số nguyên tố, với độ khó dàn trải từ đơn giản tới phức tạp, từ vòng lặp thử tính chia hết tới sàng số nguyên tố Eratosthene…
Hôm nay mình rảnh thì có nghĩ ra một bài như thế này, các bạn xem qua nhé!
Đề bài: Cho hai số nguyên dương x và y (các test case đưa vào luôn đảm bảo x > y). Viết chương trình kiểm tra xem x2 – y2 có phải là số nguyên tố hay không.
Thoạt nhìn qua thì bài này khá đơn giản. Tính x2 – y2, rồi kiểm tra. Nhưng khi x và y lớn, ví dụ cỡ 1018 thì cách này sẽ chạy quá thời gian.
Hãy quan sát biểu thức x2 – y2. Nếu bạn đã học 7 hằng đẳng thức đáng nhớ, sẽ dễ thấy rằng x2 – y2 có thể được viết dưới dạng (x-y)(x+y). Vì x và y đều là các số nguyên dương, nên x ≥ 1 và y ≥ 1. Từ đó suy ra: (x+y) ≠ 1.
Xét biểu thức còn lại, x-y. Sẽ xảy ra hai trường hợp là (x-y) ≠ 1 và (x-y)=1. Với trường hợp đầu tiên, x2 – y2 sẽ không là số nguyên tố vì vi phạm định nghĩa (chỉ có hai ước là 1 và chính nó). Do đó với (x-y)=1, biểu thức ban đầu sẽ tương đương với chỉ x+y. Ta chỉ cần xét x+y là đủ. Sau đây là code miêu tả bài toán này.
bool primeSquare(long long a, long long b)
{
    if (a-b != 1) return false;
    long long num = a + b;
    if (num % 2 == 0) return false;
    for (long long i = 3; i*i <= num; i += 2)
    {
        if (num % i == 0) return false;
    }
    return true;
}
Below is a sample script to plot vector field using the package matplotlib in Python
import numpy as np
import matplotlib.pyplot as plt

x,y = np.meshgrid(np.linspace(-5,5,10),np.linspace(-5,5,10))

u = 1
v = 0
# (u,v) = (1,0) : left to right
# (u,v) = (0,1) : up

plt.quiver(x,y,u,v,color='blue')
plt.show()
I’m writing this post as I need to install node.js and npm to install packages for reveal.js, I’m on Ubuntu 18.04 Bionic.
Normally we can install node.js via terminal by
sudo apt install nodejs
But this is not the best way since the version is outdated and some dependencies won’t meet. The best way to install the latest node.js and npm is via nvm.
Note that the version number can be checked by going directly to the website and see. The above script will download all the package and put nvm into the Linux alias (so we can use the nvm command globally). After this, log out and log in to activate the alias.
Once you log in, run below script
nvm install node
To update:
nvm install node
nvm alias default nodenvm install node
nvm alias default node
More and more people are using Anaconda for their Python needs. One important thing to notice is that Python has two version 2.7 (supported till 2020) and 3.6. Some packages are still using Python 2.7, also, when you install a suite of program for certain purpose (data analysis, image processing…), creating one environment for each purpose is a wise move.
Sublime Text (ST) is a very fast and intuitive text editor, it supports Win/Linux/Mac. We can download and use it for free (with some notification about purchasing), or we can buy a license ($80) at the time I write this blog post.
Running a Python script in ST is simple. You edit the script, choose the build system as Python, then Ctrl + B or choose Build to run the script. However, this would work only when you define Python Path for the system. How about those environment you created in Anaconda? You can do that easily by the package in ST, named CONDA.
To install CONDA, you need Package Manager inside ST. The complete guide can be found here. Then in ST, you should choose the Build System as Conda instead of Python. Now every time to want to activate the right environment, in ST just press Ctrl + Shift + P (to open the Package Option Panel) then type in CONDA, all the possible options are there.
You may be familiar with quick-sort, but when you stumble across this problem, it turns out to be a lot more complex. Since you need to determine the method that involves the fewest moves possible, you will have to take another approach. The given problem can be re-stated into this problem:
Problem statement
Hien is the class monitor and he wants his classmates to form a line, in which the height of every students is in ascending order. He needs to form that line by moving his classmates from the line to the start or end of it and it has to be a quick process, since Hien is very lazy and needs to play Age Of Empires right away. Write an algorithm to help him.
Input format
First line: n.
Second line: n numbers indicating the height of every student in the class, each seperated by a space.
Constraints
n ≤ 100; H[i] ≤ 100000 (H[i] is the height of an individual).
Output format
An integer indicating the fewest moves possible.
Sample input
4
2 1 3 5
Sample output
1
Explanation
The student with height 1 is moved to the start of the line.
Let’s not pay attention to the ‘fewest moves’ for a while. Normally, when you see these types of ‘moving’ elements to start or end of an array, you can take a look at a basic approach.
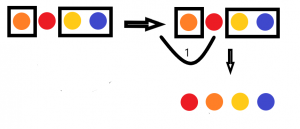
Let’s take the Sample input as an example. With the basic approach, we search for the smallest element in the array, which is now 1. After that, we move it to the far right of the array. Then, we search for the next smallest element, which is 2, and we keep doing it until 5 is moved to the far right of the array. We come to the conclusion that for this approach, the number of moves that are taken is exactly equal to the number of elements present in the array itself. But let’s have a closer look. We can see that 2, 3 and 5 are contiguous, meaning that the relative order between them is not changed at all when sorting is completed. So, we can know that in the required algorithm, we need to conserve the order of contiguous integers. That is when std::pair comes to use.
Basic approach illustration
What is std::pair, exactly?
Std::pair is a pre-defined class in C++. A pair element is consisted of 2 other sub-elements, which can be classified as first and second. In the algorithm we are searching for, as stated earlier, we can utilise std::pair to get the job done by assigning the input elements to first and its index to second.
Get the job done
After that, quick-sort comes in handy. We then use it to sort the array in ascending order. Because std::pair is used, when sorting the elements, each index is carried along with the data. Then, we can just compare the indexes of every subsequent element. Job done!
The new Gutenberg editor provided by WordPress is pretty neat. However, there are certain limits of the ability to align text as what we usually do in Microsoft Word, especially the nice-looking “justified text”.
In earlier version of the editor, we can open the extended editing bar and there would be a Justified Alignment option to click and apply on the paragraph. The current one doesn’t have it. To resolve this problem, there are several options: install the old editor plugin (which will be supported till 2022), or simply put the CSS code in the Additonal CSS section of the current theme setting:
p {text-align:justify}
Then all the paragraphs from now on will be formatted as Justified.